
Welcome to a new world of cleaning.
First off, we're so happy you're here! If you're anything like us, we love our cars and love keeping them in tip-top condition. As you've now upgraded your car care to Snow Foam, let's delve into making your car care experience better than it ever was before by learning how to use them the way they're intended to. We all have our ways of doing things, so if an alternate way works for you, go for gold!

1. Wash In Shade
2. Toss Your Old Gear
3. Ensure The Car is Cool To Touch
4. If you drop it, wash it
5. Separate Your Towels
General Car Cleaning Rules
Let's start with the rules of the game. There are a few absolute no-no's that you should know in order to keep your car cleaner for longer. We do love doing a full paint correction on our cars once in a while, but the longer we can prolong our visit to the detailer, the more money we save.
Here's our general car cleaning rules:
1. Wash in shade where possible
You don't want soap, water, waxes or sealants to be frying on your hot car panels. This can leave unwanted streaks and makes it even more work to get your car clean. Try your best to find shade or work during the morning or toward sunset when the sun isn't as harsh if you cannot find shade.
2. Toss your old gear
Old, dried up, dirty towels, wash mitts or chamois can contain used chemicals along with not being super soft on your paint. Do yourself a favour and keep your cloths, mitts, chamois and towels all clean or replace them. You don't want that rubbing up against your expensive paintwork.
3. Ensure the car is cool to touch
It's best to avoid washing your car straight after a drive. The engine is hot so therefore your bonnet will be hot and your wheels and brakes will be radiating heat too. Applying wheel cleaners or Snow Foam on these areas is similar to washing the car in the sun.
4. If you drop it, avoid it.
Dropping any of your equipment that is to be used on your paint and quickly brushing it off to use again is extremely tempting but can cause more damage than good. Take your time and grab a new cloth or wash mitt or thoroughly clean it. The amount of dirt on the ground on these cloths can include dirt, rocks, sand and these will lead to endless swirl marks.
5. Separate Your Towels
Avoid using the same towel to dry your car that you would use to dry your wheels and in the same way, avoid using the same microfibre cloth for the exterior that you would use on the interior. We don't want the wrong chemicals going onto surfaces they aren't intended to go on. It's common sense, but the laziness in us will simply fold it and go. Again, take your time and do it right.
There's plenty more rules that we live by but starting with these 5 already get's you ahead of the game. Let's get started learning about the Snow Foam Lance, Snow Foam Gun, Short Trigger Guns and our range of Car Care Chemicals.
Learn How To Use The Snow Foam Lance

-
Setting Up The Adaptor
Ensure you use the PTFE tape around the thread of the male-to-male adaptor which attaches to the brass body of your Snow Foam Lance. Screw your adaptor on tightly and make sure the tube is connected to the brass Lance head. For Karcher owners, ensure the two wings of the adaptor point directly up and down to ensure the Lance is straight when plugged in.
-
Connecting the Snow Foam Lance to your Pressure Washer
Your pressure washer handle will have a detachable spraying wand near where you pull the trigger to release the water. Usually you will need to push this attachment toward you, twist and the attachment will release. Where this sprayer wand is attached to is where your Snow Foam Lance will go. Some pressure washer models have two sections that can be detached such as the Gerni brand, so ensure it is the attachment as close to your trigger hand is, not the furthest one.
-
Using the Snow Foam Lance
Fill the Snow Foam Lance bottle with 900mL of warm water followed by 100mL of your favourite Snow Foam Detergent. We have our original Snow Foam Detergent, Snow Foam Berry Thick, Fourby Foam and Salt Cleanse. Give it a quick shake and spray your car from bottom up. Ensure the top dial is set toward negative (-) which means less water and more soap. Then hold the end of your Snow Foam Lance (either the long red or black part) and rotate it slowly to get your desired spray pattern
-
Washing The Car, Bike or Boat
We foam the vehicle from bottom up ensuring we don't miss any sections. We like the wider spray pattern to get an even coverage of foam on the vehicle. We let this dwell for 5-10 minutes before a thorough rinsing. We then apply a second layer and proceed with a two-bucket-wash method to ensure all the stubborn dirt and grime is off the car as safely as possible.
-

Learn How To Use The Snow Foam Gun

-
Setting Up The Snow Foam Gun
Firstly ensure that all parts of the Snow Foam Gun are tight including the gold quick release adaptor and the hose end. You can rotate the hose trigger adjustor to ensure it is to your liking. From here, simply plug the Snow Foam Gun into your garden hose like you would with any other garden hose accessory, ensure it is tight.
-
Using The Snow Foam Gun
Place 800ml of warm water followed by 100mL of Snow Foam Detergent into your bottle. Screw the bottle onto your Snow Foam Gun's body and attach the quick release adaptor on your garden hose trigger to the body by pulling back on the black ring. Squeeze the trigger and off you go.
-
Three Types of Spraying Modes
You can rinse, foam and jet spray with the Snow Foam Gun. For rinsing, take off the Snow Foam Gun body and use the trigger handle to rinse the car. Attach the Snow Foam Gun body onto the trigger handle along with the end nozzle for foam. For jet spraying, keep the body on the trigger, but remove the end nozzle.
-
Adjusting the Dial
With our latest model of Snow Foam Guns, the highest foaming setting is at setting 5. Rotate this top dial to your liking with 0 being the least detergent and 5 being the most.
Learn How To Use The Snow Foam E-Foamer

-
Setting Up The E-Foamer
Firstly plug the E-Foamer into a 5V or 9V charger with the provided USB charging cable. Open the accessories bag to find two rubber gaskets which will be used before screwing on the Foam Nozzle or the Spray Nozzle.
To Foam: Fill the E-Foamer up with 1750mL of water and 50mL of Snow Foam Detergent and screw the head to the bottle tightly. Turn the E-Foamer on and let it compress air into the bottle for 15 seconds. Push the handle trigger and foam away. You can adjust the end nozzle to spray in the orientation that you like whether it be horizontal or vertical spraying.
To Mist: Swap the Foaming Nozzle to the Misting Nozzle ensuring the gasket is used. Fill the E-Foamer with your favourite Snow Foam solutions and mist away with the trigger.As you spray on either setting, the E-Foamer will automatically top up the air compression as you spray ensuring that you can continuously spray as needed. There is no need to manually pump the E-Foamer.
-
Airing Out
When you're done, simply pull the top valve up and the air will disperse. Ensure the unit is off before doing so.
-
Storage
It is advised to clean out the E-Foamer after each use, but if the solution is not acidic it is fine to store it in the E-Foamer if you intend to use it again in the near future.
-
Automatic Spraying
Depress the trigger and slide it forward into the trigger lock position. This will have the E-Foamer spraying automatically.
-
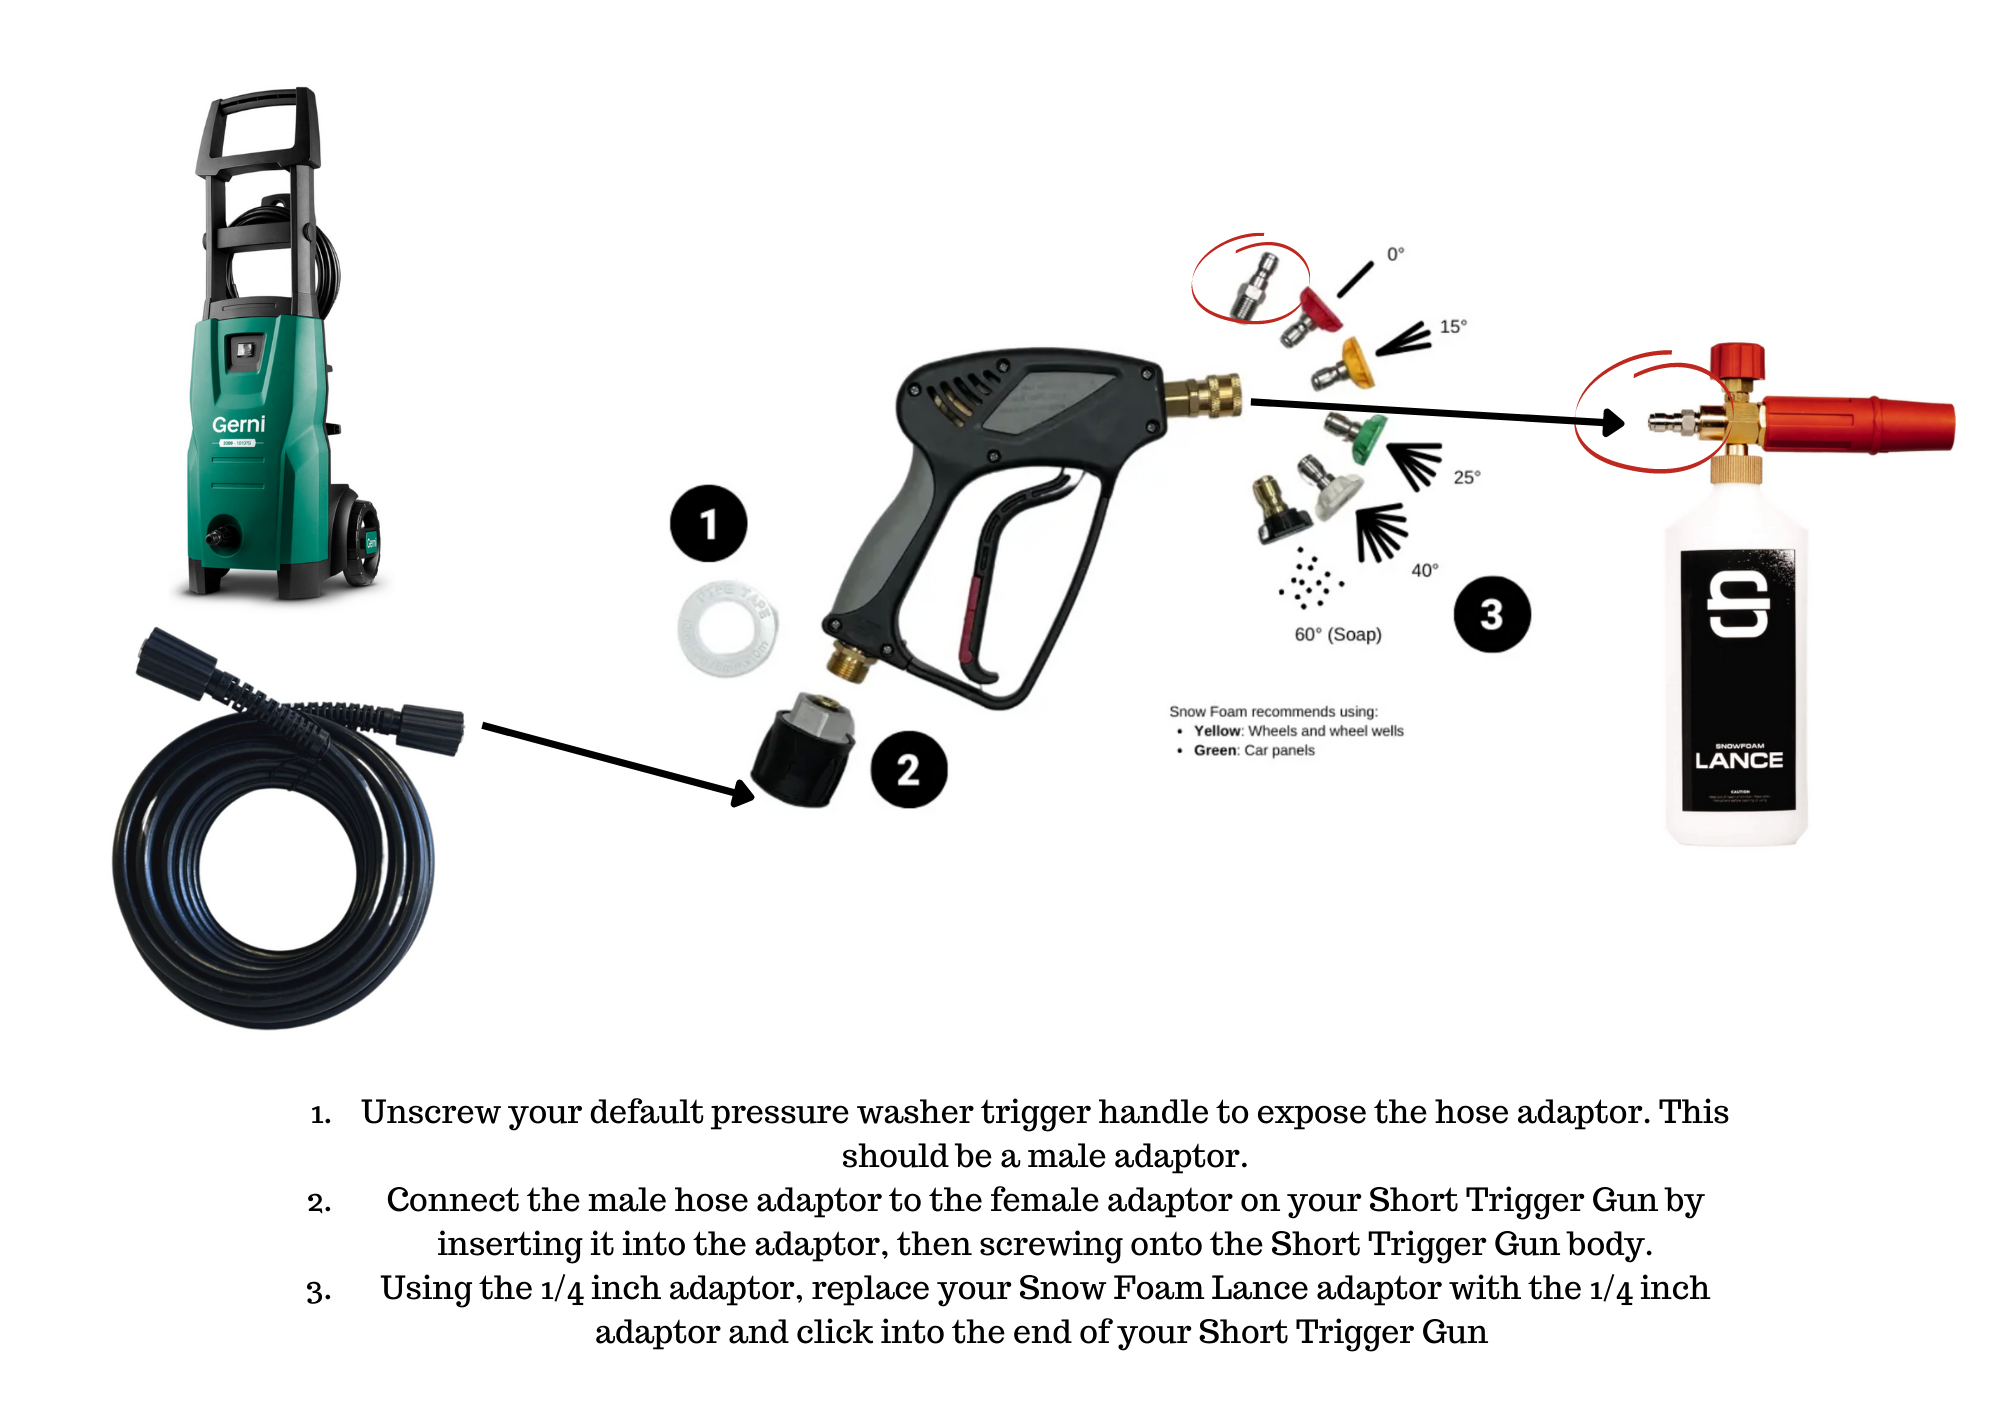
Learn How To Use The Snow Foam Short Trigger Gun

-
Setting Up The Short Trigger Gun
If you have been given a small cube box with an adaptor in it, you will need to use PTFE tape around the brass thread of your Short Trigger Gun approximately 5-8 revolutions. Screw this adaptor onto your Short Trigger Gun and tighten.
If you are using an M22 adaptor, simply PTFE tape the brass thread on the end adaptor.
Proceed to click in your pressure washer's hose via the adaptor or screw it in via the m22 adaptor.
-
Using The STG with a Ryobi Pressure Washer
Models of Ryobi such as the RPW140G and RWP150G along with some older Karcher models will require our Long Weekend Hose replacement pressure washer hose to fit the Short Trigger Gun.
-
Spraying The Car
To use the Short Trigger Gun you will need to pull back the gold quick release end and insert one of the coloured nozzles and lock it in tightly. If the nozzle isn't in tightly, you can have this small piece be blasted by the water pressure and cause damage to yourself, other or your car. For this, shoot at the ground first and never point it directly at another human being or animal.
-
1/4 Inch Adaptor
If you are intending to use your Snow Foam Lance with the Short Trigger Gun, you will need to switch the existing adaptor to a 1/4 inch quick connect adaptor. It will then click in and out like the 5 coloured nozzles.
-
-
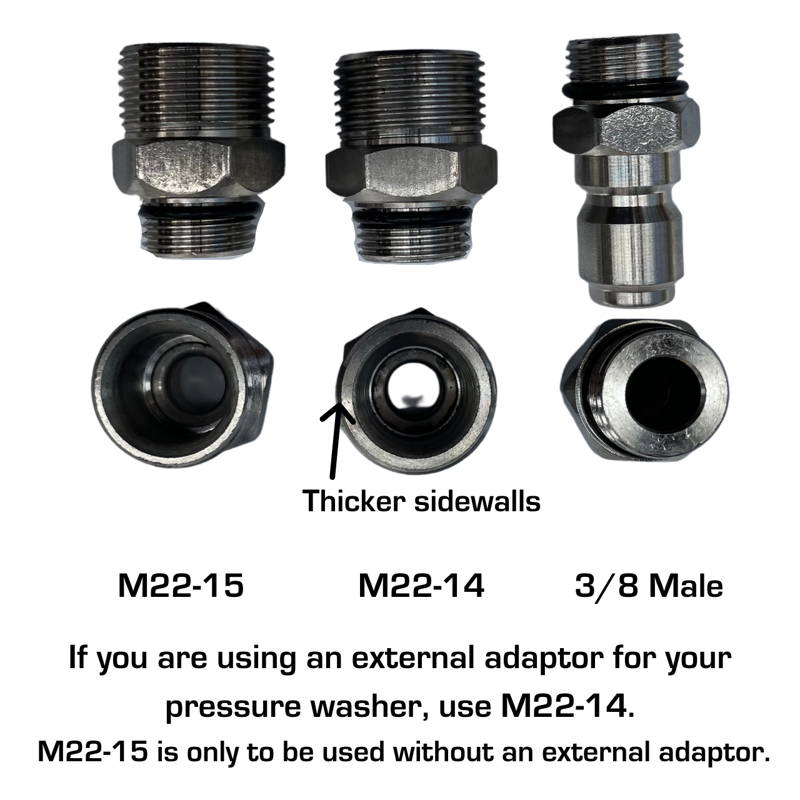
Received 3 silver adaptors?
In certain cases, you will receive three silver adaptors in your package. Below is a guide to selecting the correct one.M22-15 is generally used for Ryobi machines where the hose end is a female m22 adaptor.
M22-14 is used before attaching any external adaptor such as Gerni or Karcher machines where you receive an adaptor in a cube box or one that is labelled SF1, SF2, SF3 or SF4.
3/8 Male adaptor is used when you have a female 3/8 inch quick connect adaptor.
Exterior Car Care
Gloss Wash
- Use a two-bucket wash method and add 50mL per 10L bucket into your wash bucket
- Using a wash mitt, scrub vehicle from top to bottom. Rinse in rinse bucket.
- Rinse car and dry with Twister Towel or Waffle Weave Towel
- Allow the full gloss effect to come to life 8 - 12 hours post wash
Ceramic Detailer
Ceramic Detailer is the dry-apply equivalent of Snow Foam Shield range. In shade, after a wash, simply mist on to each panel and buff off to unleash an intense shine and hydrophobic finish. Always use clean microfibre cloths.
Quick Detailer
Quick Detailer is a surface spot treatment to remove contaminants before they can bond to your paint. Spray onto the contaminated surface, and wipe with a folded microfibre cloth, then dry with the other clean side.
Shield Hydrophobic Spray
After washing your car and the panels are still wet, spray Snow Foam Shield on your clean panels and wipe in with a clean microfibre cloth. Apply when wet and rinse off before drying.
Shield Hydrophobic Concentrate
Applicable by Snow Foam Lance, 100mL of Snow Foam Shield with 900mL water will give your car the hydrophobic finish you've been looking for! Apply when wet and instantly rinse off before drying.
Spray Wax
Quick Detailer is a surface spot treatment to remove contaminants before they can bond to your paint. Spray onto the contaminated surface, and wipe with a folded microfibre cloth, then dry with the other clean side.
Clear - Window Cleaner
After washing your car, spray clear directly onto windows or onto clean microfibre cloth. Gently rub until clean. Repeat on all windows ensuring you switch to clean sections of the microfibre towel.
Tar Remover
Simply spray on and let it break down the tar and agitate if needed. Using a detailing brush can assist in removing stubborn tar. Rinse thoroughly.
Black Trim Restorer
Apply to clean and cool surfaces.
1. Shake well before use.
2. Apply a small amount to the applicator.
3. Spread evenly until the surface is evenly coated.
4. Allow a dwell time of 1 - 2 minutes.
5. Wipe away any excess from the surface with a clean cloth.
6. Allow drying for up to 1 hour to a natural new finishing look.
Wheel Care
Purple - Iron Dissolving Wheel Cleaner
1. Spray wheels when car is dry. Best to leave car to cool down and ensure you do not miss any smaller curves on the wheel's design.
2. Let Purple dwell and dissolve the brake dust. When you see the purple bleeding, this is when you know it is time to rinse.
3. Rinse thoroughly ensuring all product is rinsed off
4. Check wheels, follow with light scrubbing if needed.
5. Dry wheels and proceed to use Tire Shine.
Always test on an inconspicuous area before proceeding.
Wheel Cleaner
1. Spray wheels when car is dry. Best to leave car to cool down and ensure you do not miss any smaller curves on the wheel's design.
2. Let Wheel Cleaner dwell and dissolve the brake dust. Only needs 30-60 seconds of dwell time.
3. Rinse thoroughly ensuring all product is rinsed off
4. Check wheels, follow with a second layer with light agitation with wheel brush if needed.
5. Dry wheels and proceed to use Tire Shine.
As an alkaline-based solution, avoid using Wheel Cleaner on polished or raw aluminium wheels as bleaching may occur. Always test on an inconspicuous area before proceeding.
Tyre Shine
Simply mist onto your clean tyres and if needed, spread across tyre to even out the shine. Wipe any overspray and leave to settle in before driving away. You will now have tyres looking refreshed and ready for the road or show and shine.
Tyre Gel
Simply use a coin-sized amount onto a clean tyre applicator and apply onto your clean tyres. Swipe across tyre face ensuring you haven't missed any spots. You will now have tyres looking refreshed and ready for the road or show and shine.
Interior Care
Interior Cleaner
Simply mist spray onto your dashboard, trims and fabric and say goodbye to your interior dirt and grime. Simply wipe off with a microfibre cloth and breath in the pleasant, clean fragrance.
Interior Cleaner can be agitated with a brush or drill brush for deeper cleaning and removed with an extractor or wet vacuum.
Fresher Leather
Simply mist spray onto your seat one section at a time and agitate with a brush or cloth. Wipe off with a clean microfibre cloth.
Best used after Interior Cleaner
Interior Trim Rejuvenator
Clean interior plastics with Snow Foam Interior Cleaner
Apply a coin sized amount of Interior Trim Restorer onto a clean microfibre cloth or pad
In a circular motion, work at the interior plastics ensuring an even finish
Using a clean microfibre cloth, wipe over the area
Tyre Gel
Simply use a coin-sized amount onto a clean tyre applicator and apply onto your clean tyres. Swipe across tyre face ensuring you haven't missed any spots. You will now have tyres looking refreshed and ready for the road or show and shine.
ULTIMATE KITS

1 - Interior Cleaning
Simply mist spray onto your dashboard, trims and fabric and say goodbye to your interior dirt and grime. Simply wipe off with a microfibre cloth and breath in the pleasant, clean fragrance.
Interior Cleaner can be agitated with a brush or drill brush for deeper cleaning and removed with an extractor or wet vacuum.
We like to do the interior first so we aren't stepping into the car with wet feet or hands.
2 - Wheel Cleaning
Attend to wheels with Wheel Cleaner or Purple. Spray on and rinse off within 30 seconds - 60 seconds. Scrub with Microfibre brush or Bristle Brush as necessary.
3 - Snow Foam Initial Prewash Layer
Snow Foam the car with 100mL of Snow Foam Detergent and the remainder water. Allow to dwell for 5 - 10 minutes before rinsing.
Best to foam bottom up so that any foam run off doesn't disrupt the foam sticking to the car.
4 - Snow Foam Contact Layer
With the remainder of the detergent in your Snow Foam Lance or Gun, perform a second layer. This layer will be scrubbed gently with the Snow Cloud Wash Mitt. Rinse thoroughly.
During this stage, you can use ORANGE degreaser on your exhaust tips and side steps before agitating.
5 - Snow Foam Shield Hydrophobic Spray
Whilst the car is wet, mist on a layer of Shield Spray on all panels. For best results, use a microfibre cloth to spread the product evenly on all panels. Rinse thoroughly after 30 - 60 seconds.
6 - Dry with Twister Towel
Lay the towel on the roof of the car flat and pinch two corners of the towel before sliding the water off.
7 - Finishing Touches
The car is now dry and you can apply Spray Wax for a shiny final finish, Tyre Gel on the tyres for a satin shine, and Clear Window Cleaner to finish up the windows.
8 - Clean Your Microfibre Towels
Ensure you pop your towels and brushes into the wash and look for Microfibre Wash to have them ready for your next wash.
Washing Your Microfibre Cloths, Wash Mitts and Drying Towels

- Safe for all microfibres
- Removes chemicals, dirt, grime, polishing compounds, sealants from microfibres
- Leaves microfibres clean, soft and fresh
- Retains microfibre softness and absorption
- Fragrance-Free (as compared to unscented/masked fragrance)
- Fabric Softener Free
Washing Directions:
Add 30mL of SF Microfibre Wash to your light load (double for heavier loads)
Washing your car washing hardware separate from any other laundry
Use the warm water setting
For heavier stained items, soaking your microfibre in Microfibre Wash before machine washing.
Drying Directions:
Place your microfibres into the dryer and dry using the low heat setting.
Alternatively, dry in shade.
Heat can damage microfibres making them less functional and can potentially scratch your paint.
Can be used with:
- Drying Towels
- Wash Mitts and Sponges
- Wheel Brushes
- Polishing Pads
- Chamois
Share:
Wheel Cleaner VS Purple?
Want To Clean Your Caravan? Snow Foam It!